Thursday 6 September 2012

Openbravo for Retail Developers Guide

The new Openbravo for Retail that has been recently announced includes a new point of sale (POS) application. It is very easy to use, designed for touch screens and to support multiple POS devices.

Openbravo for Retail has been designed with modularity in mind allowing developers to customize and extend this new point of sale application easily in a modular way. To help developers with this task we announce the first version of the Openbravo for Retail Developer's Guide that includes documentation about all the new technologies created by Openbravo to develop this new point of sale.

The Openbravo for Retail Developer's Guide has been created with a similar structure of the Openbravo Developer's Guide. This is an overview of the included categories:

  • The Concepts section gives a detailed description of all relevant Openbravo for Retail development concepts.
  • The How-to sections describe Openbravo for Retail development topics using a focused development goal.
Openbravo for Retail is based on Openbravo 3 technology. Before starting with the Openbravo for Retail Developer's Guide it is a good idea to have a look at the Openbravo Developer's Guide that explains the concepts Openbravo for Retail is based on.

This is the first version of the Openbravo for Retail Developer's Guide. We will continue working on it creating new and polishing existing documents. You are invited to help us improve this documentation. Leave your feedback in the Openbravo for Retail forums or contribute directly to the articles.

Thursday 14 April 2011

How to create new import process with Initial Data Load

Initial Data Load is a commercial module available for Openbravo ERP Professional Edition subscribers to import data that provides out of the box several import process oriented to set up all the data needed to start working with Openbravo ERP. After importing data with the provided processes, users will be able to genereate the initial balance sheet and to enter new transaction documents like orders, shipments and invoices.


This makes Initial Data Load a great tool focused to make shorter and cheaper the implementation process of Openbravo ERP but also Initial Data Load is extensible. You can use all the elements and tools provided, like the user interface, default values management, utilities, etc... to modify the existing processes to be adapted to your business requirements and to create new ones to import custom data. This way if you want to create a new process to import data you only need to focus in the logic because all the infrastructure provided by Initial Data Load will be reused.

To help with the task of creating new data import processes for Initial Data Load it is helpful the module Initial Data Load extension for Java. With this new module you will be able to develop a new data import process with a single java class and few lines of code. In this guide I will explain step by step the process of creating and deploying a new data import process using the java class sample included in the Initial Data Load extension for Java. After you read this visual guide you will be able to write, install and execute new processes quickly and reduce a lot the time needed to implement a fully working Openbravo ERP following your business requirements.

Step 1. Installation of the required modules

Log in as System Administrator and activate your instance in General Setup >> Application >> Instance Activation . To activate your instance you need first to adquire an Openbravo ERP Professional Subscription and use the System Key Openbravo will send to you.

After you have your instance activated, go to General Setup >> Application >> Module Management and install the modules Initial Data Load and Initial Data Load Extension for Java.


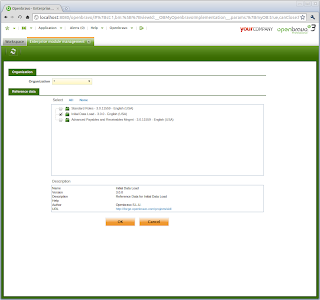
Step 2. Install the dataset.

The dataset provided by the Initial Data Load module contains the definition of the provided import processes and the default values for each process.

Login as your Client Administrator and go to General Setup >> Enterprise >> Enterprise Module Management, select Initial Data Load and press OK.


Step 3. Configure a new process.

The module Initial Data Load for Java provides a sample java class that implements an import process to import products. Now we are going to configure this class to invoke it from the Initial Data Load process window.

Go to Master Data Management >> Initial Data Load >> Setup >> Entity Default Values. Create a new record and fill in the field values. Pay attention to the field Class Name. The value must be org.openbravo.module.idljava.proc.SampleProductsProcess that is the name of the java class that implements the sample products import process.

If you cannot add new records, it is because there is a know issue already fixed in the Initial Data Load that prevents you to create new records. For more information about this, go to the issue report 16787.


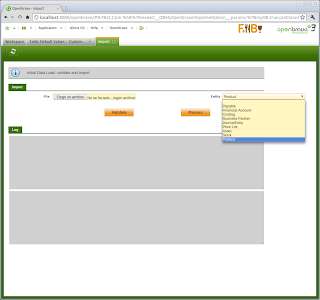
Step 4. Execute the new process

Now we have everything we need to execute the new configured process that imports products. Go to Master Data Management >> Initial Data Load >> Process Import. Select the new configured process, in our example Custom Products. You can use this products sample CSV file to test the execution of the process. Press Validate or Process. Validate only checks that the data to import is valid but does not actually import the data. Process checks that the data is valid and import the data.

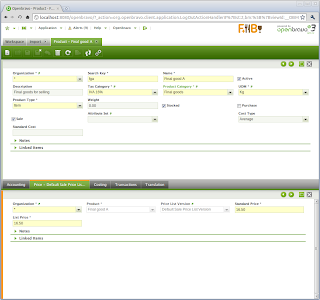
This is the result after pressing Process.


And one of the products imported:


Quick review the java class that implements this new process

The sample import process used in this post is SampleProductsProcess and is included in the module Initial Data Load for Java and you can use it as a foundation for the new processes you want to create. Here I will explain the main parts of this java class.

All classes that use Initial Data Load for Java to implement a new import process must extend the java class IdlServiceJava.

public class SampleProductsProcess extends IdlServiceJava {
...

Implemeting this class you must override the following methods: getEntityName() that returns the name of the process:

@Override
public String getEntityName() {
return "Sample Products";
}


getParameters(), that returns an array with the definition of the fields that will be used in this process. Each parameter basically consist in a field name and a data type:

@Override
public Parameter[] getParameters() {
return new Parameter[] {
new Parameter("Organization", Parameter.STRING),
new Parameter("SearchKey", Parameter.STRING),
new Parameter("Name", Parameter.STRING),
...

validateProcess() that validates the integrity of each record in the CSV file. For this task Initial Data Load provides the utility class Validator that has several test methods to check the data integrity:

@Override
protected Object[] validateProcess(Validator validator, String... values) throws Exception {
validator.checkOrganization(values[0]);
validator.checkNotNull(validator.checkString(values[1], 40), "SearchKey");
validator.checkNotNull(validator.checkString(values[2], 60), "Name");
...

And internalProcess() that actually imports the data. The recommended way to create Openbravo business objects and store it in the database is the Openbravo Data Access Layer (DAL) that provides an interface to all the Openbravo Business Objects and logic.

@Override
public BaseOBObject internalProcess(Object... values) throws Exception {
...

If you want an example of a module using Initial Data Load for Java, have a look at the project Initial Data Load extension for invoices. A module that implements a new data import process that allows to import invoices using Initial Data Load.

Monday 15 November 2010

Improving Openbravo ERP Shipment documents using Extension Points


Extension Points [1] is a cool feature that allows to enhance the capabilities of the core flows in modules without customizing Openbravo ERP. This way you will not have any conflict between the new enhancements in the core flows you developed and the upgrades of Openbravo ERP. Extension points are hooks in the core PL/SQL procedures that performs the business logic of the core Openbravo ERP flows that allows to add other PL/SQL procedures to the flow that enhance and modify the functionality.

To demonstrate the capabilities of the Extension Points that the Shippment Flow includes [2]. I created a very basic Picking and Packaging module that modifies the Shipment flow adding the following functionality:

  • Processes "Create Shipments from Orders" and "Generate Shipments" generate shipments in draft status and do not complete them automatically. This allows a new step in the shipment process to pick the goods from the warehouse and pack everything together before goods are delivered to the customer.
  • A new field is defined for all Shipment lines. This field is "Ready". When this field is marked it means that the goods of the line are ready for delivery to the customer. A shipment cannot be completed until all lines are marked as "Ready".
  • For informations purposes it has been added a new field named "Due date" in the Shipments header. This field will be useful for example to create reports that list late Shipments not yet delivered.

To dig into the technical details how Extension Points are used in this module. These are the new PL/SQL functions created.

  • PNP_CREATEDRAFT [3]. This function is hooked to the Extension Point "M_Inout_Create - Calling Post Process" that is executed in the automatic generation of shipments. This function just indicates that the generated shipments must not be completed.
  • PNP_VERIFYREADY [4]. This function is hooked to the Extension Point "M_Inout_Post - Finish_Process Extension Point" that is executed when completing a Shipment document. This function verifies that all lines of the Shipment are marked as ready, and if any of the lines is not ready it cancels the process.

The Picking and Packaging module is hosted in the Openbravo Forge [5], you can inspect the source code [6] and you can install also in your Openbravo ERP instance using the Module Management window. The latest version is 1.0.1 and it has a been published in "Test" maturity status, so if you want to install in your Openbravo ERP instance you need to modify the Standard Settings of the Module Management window. This Picking and Packaging module is not intended for production environments.

This module is basically a proof of concept of what can be done with Extension Points and Modularity to extend and improve Openbravo ERP capabilities but if you like it and you want to continue implementing more functionalities you are welcome, just send a message to me.

If you want more details about the internals of Extension points I recommend this blog post [7] by my colleague Gorka Ion.

[1] http://wiki.openbravo.com/wiki/ERP/2.50/Developers_Guide/Concepts/DB/PL-SQL_code_infrastructure#Extension_points
[2] http://wiki.openbravo.com/wiki/ERP/2.50/Developers_Guide/Reference/ExtensionPoints
[3] https://code.openbravo.com/erp/mods/org.openbravo.module.pickingandpackaging/file/1.0.1/src-db/database/model/functions/PNP_CREATEDRAFT.xml
[4] https://code.openbravo.com/erp/mods/org.openbravo.module.pickingandpackaging/file/1.0.1/src-db/database/model/functions/PNP_VERIFYREADY.xml
[5] http://forge.openbravo.com/projects/pickingandpackaging
[6] https://code.openbravo.com/erp/mods/org.openbravo.module.pickingandpackaging/
[7] http://obdeving.wordpress.com/2009/10/27/extending-existing-procedures-at-openbravo/

Thursday 30 September 2010

Amazing uses of Openbravo POS

The community around Openbravo POS is very active and with clever members that take advantage of the product to create great things. One of the best examples of I found recently through a post in the Spanish forums [1] is the use of an iPad with Openbravo POS.

This solution has been implemented by a Trattoria in Peru called Don Angelo [2]. The iPad is offered to the customers of the restaurant instead of the menu, and they use the iPad to view the menu, and make orders. This way orders are faster and with less mistakes. Customers find it very easy and everybody is very happy with this innovation.

This solution has also attracted the attention of the media [3] and they have also a very nice promotional video where you can see Openbravo POS in action [4].

The technical details are very simple: Openbravo POS runs inside a virtual machine in a host computer, and the iPad has installed the application WYSE pocketcloud [5] for iPad that cost only $14.99 and that allows to access to the virtual machine where Openbravo POS runs.

My congratulations to the developers of this innovative solution.

[1] http://forge.openbravo.com/plugins/espforum/view.php?group_id=101&forumid=446545&topicid=7017054&topid=7018879 (in Spanish)
[2] http://www.donangelo.pe/Trattoria_Don_Angelo/Promociones/Entradas/2010/7/21_Carta_Ipad_en_nuestro_Restaurante.html (in Spanish)
[3] http://www.peru.com/noticias/portada20100812/112347/Restaurante-peruano-entre-los-pioneros-en-el-mundo-en-uso-de-iPad-en-servicio (in Spanish)
[4] http://www.youtube.com/watch?v=xEh1WD9qeeg (in Spanish)
[5] http://www.wyse.com/products/software/pocketcloud/index.asp

Thursday 29 April 2010

The fix report

In Openbravo we have a great tool for Openbravo ERP and Openbravo POS, the Openbravo Issue Tracking System. This tool is open to all partners and members of the community. Here you can log new issues, search for open issues, closed issues, monitor the evolution of issues, participate in the issues discussions, etc. Issue reporting is very important. A good issue report is great for Openbravo engineers because it helps to evaluate the issue, and makes it easier to keep track of open issues, verify and fix them. In our wiki we have a defined QA Assurance Process and a detailed Bug Reporting Guidelines that explains how to log a good issue report. I recommend to everybody that works with Openbravo ERP and POS to have a look at these documents.

But if the issue report is very important to understand and fix the issue. The fix report is also very important too. The fix report is no more than a note added to the issue report by the engineer that explains in detail what has been done to fix the issue. The fix report makes it easier for the QA team to verify the correctness of a fix because when closing an issue they have to check that the issue is properly fixed and the modifications in the sources are correct. And it is important too for users, implementers and administrators of Openbravo ERP when they have to apply a fix or upgrade a live implementation. Changes in live Openbravo ERP environments are critical and we must provide to administrators the maximum confidence in the fixes provided. Apart from fixing the issue, the rest of the existing standard or custom functionality must continue working the same way. Usually regression issues introduced by an upgrade or a fix are several times worse than the issues fixed.

In order to improve the fix report we are introducing in the Support Team new guidelines to follow after a fix has been done and pushed to the Openbravo ERP or POS sources repository. The sections that this fix report must include are the following:
  • Testing of the issue: Describes the steps to follow in Openbravo ERP or POS to verify that the issue has been fixed and the results obtained. It is usually very similar to the steps to reproduce but changing the results obtained.
  • Explanation of the changeset that fixes the issue: High level explanation of the modifications in the sources. It should explain what has been modified in each file and why. For example when adding two new fields to a report, it has to be explained that the SQL query of the report has been modified to get the field values, the jasper report template has been modified to display the fields and also that has been included two new records in the AD_TEXTINTERFACES table to translate the report labels.
  • Other areas affected by the changeset: Usually the changes done to fix an issue affects source code that is used in several parts of the application. In this section it has to be listed all the functional areas related with the change done and how are affected, and what are the changes in the behaviour if any. This section is very important because it helps to explore if any regression can appear with this fix. For example, when modifying the PL/SQL function C_INVOICE_POST, it has to be explained that all functions and windows that create and post invoices can be affected. It also has to be explained what are the type of invoices that can be affected by the issue, whether the invoices affected by this fix depends on the document type of the invoice or the payment terms...
You have a few examples of fix reports in the following issues: 12959, 12474, 12628 and 12856. And if you have suggestions to improve more the fix report we are currently implementing, we will be glad to hear them.

Friday 12 March 2010

Simplifying development of callouts

Callouts are a piece of client logic in Openbravo ERP designed to be executed whenever a field changes and as a result changes parts of a tab/window without the need of refreshing it.

The logic performed by a callout is executed by a java servlet and you can use SQLC or DAL to access data. After the code has been written you only have to associate the callout to the column or columns that trigger the callout, and recompile the windows where this callout is used.

The problem for developers is that callout servlets have a lot of boilerplate code that is very similar in all callouts. This code is not related to the callout logic and makes it dificult to understand and maintain callouts.

To help here there is a new java class has been introduced to simplify the code of callouts and keep focused only in the logic and not in the plumbing needed to make the callout servlet work. This class is SimpleCallout and to develop a new callout based on this class you only have to create a new java class that extends SimpleCallout and overwrite the following method:

protected void execute(CalloutInfo info) throws ServletException;

In this method you can develop the logic of the callout and use the info object of class CalloutInfo to access window fields, database and other methods. The most important are:
  • public String getStringParameter(String param) : This method returns the value of a field named param as an String.
  • public String getStringParameter(String param, RequestFilter filter) : Returns the value of a field named param as an String using the filter to accept values.
  • public BigDecimal getBigDecimalParameter(String param) throws ServletException : This method returns the value of of a field named param as a BigDecimal.
  • public void addResult(String param, String value) : This method sets the value of a field named param with the String value indicated.
  • public void addResult(String param, Object value) : This method sets the value of a field named param with the value indicated. This method is useful to set numbers like BigDecimal objects.
  • public void addSelect(String param) : Starts the inclusion of values of a field named param of type select.
  • public void addSelectResult(String name, String value) : Adds an entry to the select field and marks it as unselected.
  • public void addSelectResult(String name, String value, boolean selected) : Adds an entry to the select field.
  • public void endSelect() : Finish the inclusion of values to the select field.
  • public String getLastFieldChanged() : Returns the name of field that triggered the callout.
  • public String getTabId() : Returns the Tab Id that triggered the callout.
  • public String getWindowId() : Returns the Window Id that triggered the callout.
  • public VariablesSecureApp vars : This instance field contains the VariablesSecureApp associated to the callout servlet.
You can find an example of a class that currently uses SimpleCallout to implement the logic of a callout. The class is SL_Project_Service. This callout just takes the numeric value of two fields, calculate the sum and writes the result in other field. This is the interesting part of the code that performs the logic:

@Override
protected void execute(CalloutInfo info) throws ServletException {

BigDecimal serviceSerCost = info.getBigDecimalParameter("inpservsercost");
BigDecimal serviceOutCost = info.getBigDecimalParameter("inpservoutcost");

BigDecimal serviceTotalCost = serviceSerCost.add(serviceOutCost);

info.addResult("inpservcost", serviceTotalCost);
}

SimpleCallout is currently in the pi repository of Openbravo ERP, there has not been released any version with this class included. It is not also part of the Openbravo ERP public API and until it is not included here you cannot rely on it because could change without notice. If you find that this class is interesting to be included in the public API, let me know and I will push to include it and extend it with more new functionality and functionality from other Callout helper classes.

Wednesday 3 February 2010

Prototyping with HTML 5 (2)

This blog post is just to announce the availability in the Openbravo forge of the prototype of the HTML 5 application based on Openbravo ERP web services I am working on. The project home page is Openbravo Mobile. And it is published the source code, a deployable .war file and an small wiki page with instructions to install. Everything under the Openbravo Public License.

All comments are welcome in the forum section.

Disclaimer: The project I am developing here is done in the personal investigation time I have reserved during development sprints and it is not in the roadmap of Openbravo ERP and there is not commitment from Openbravo to his partners, customers or community related to the availability or support of this project.